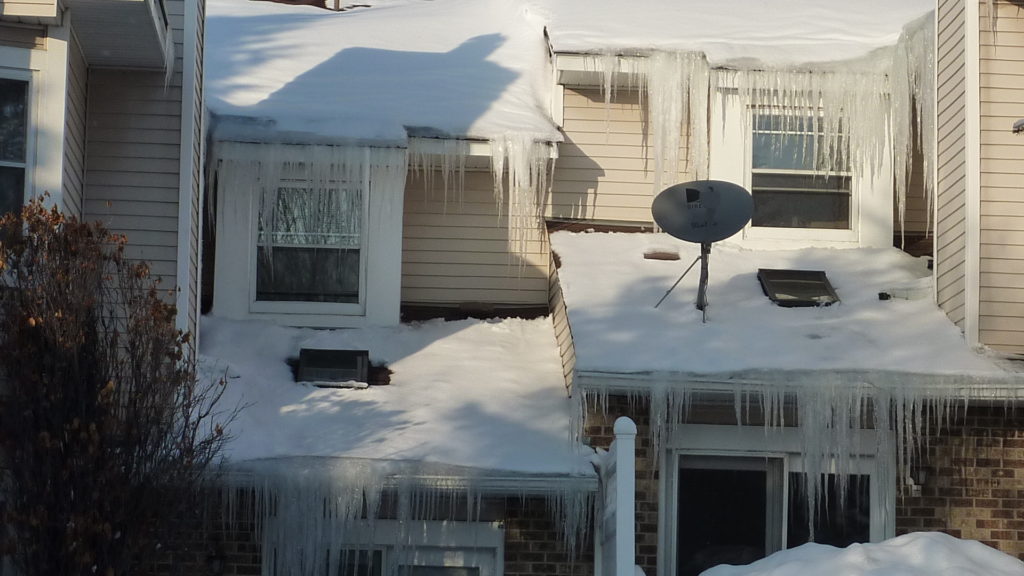
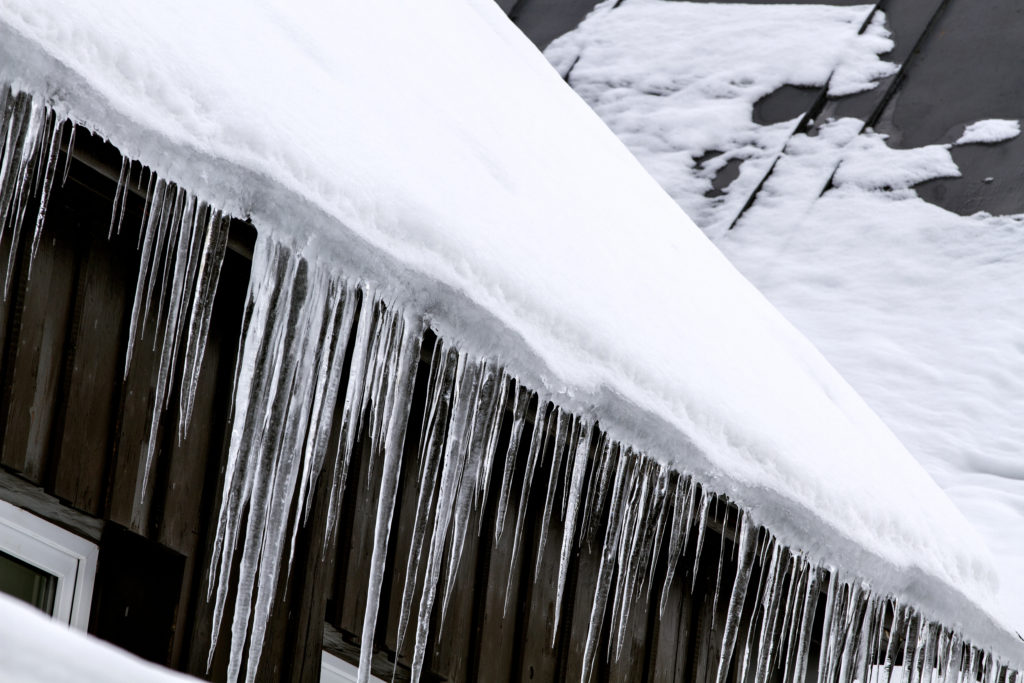
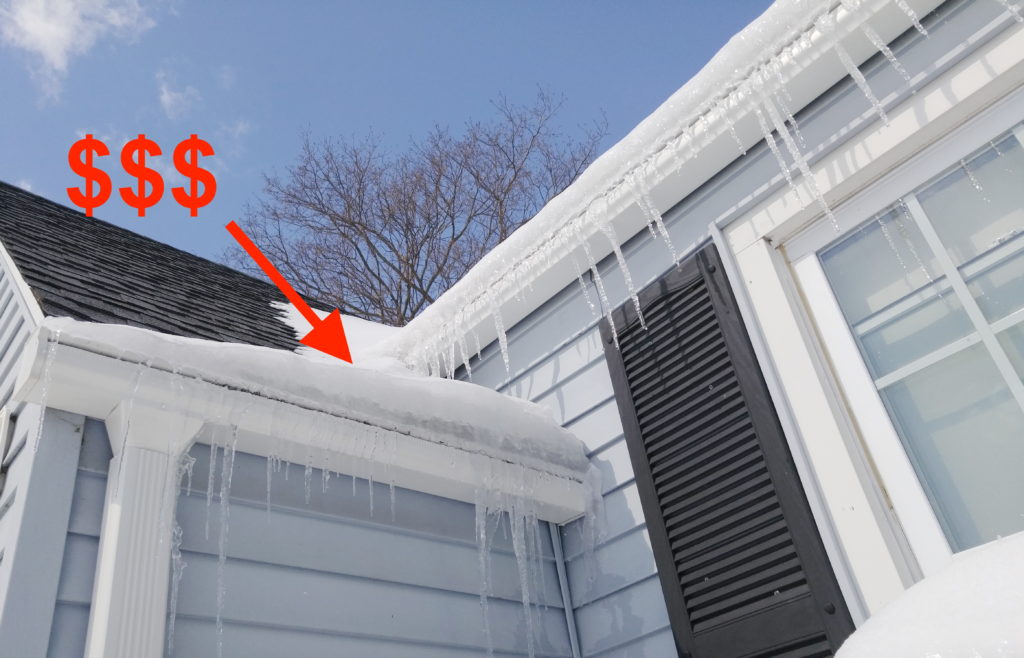
There is no doubt that ice dams can be a huge menace to homeowners living in the northern hemisphere.
Sometimes we don’t realize what a silent threat they are until water starts leaking into the home.
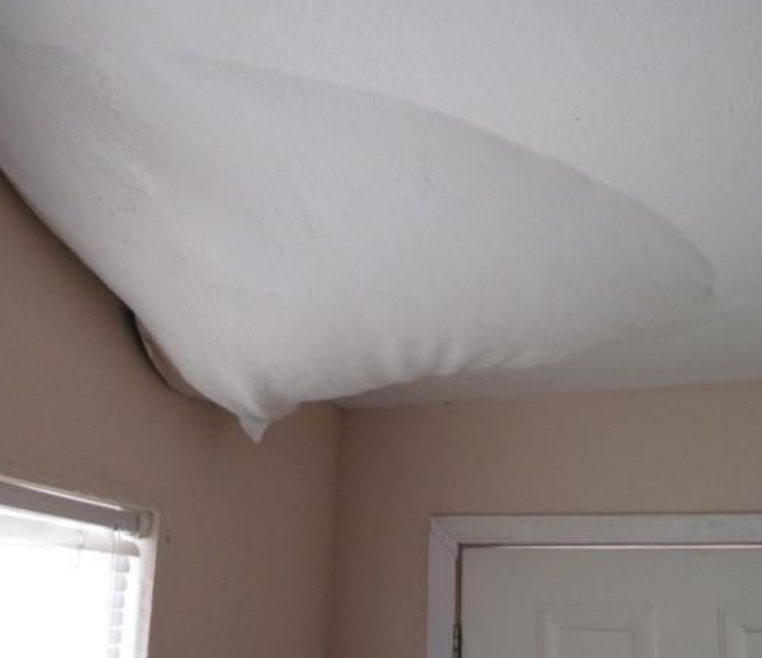
This scenario should be avoided at all costs to prevent expensive repairs, drywall replacement, and degradation of other building components.
So, what is the best approach to preventing and curing ice dams for good?
If you are looking for answers, but are overwhelmed sifting through all the information on the internet, you’ve come to the right place.
Read on to learn about how ice dams form, prevention methods, as well as short and long term solutions.
What are Ice Dams:
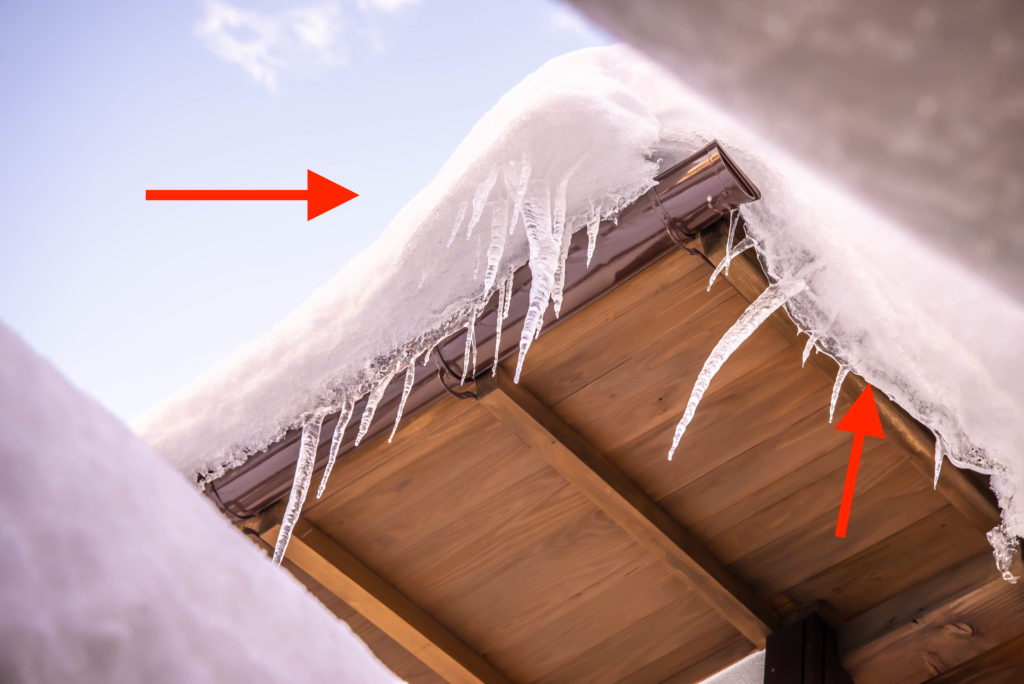
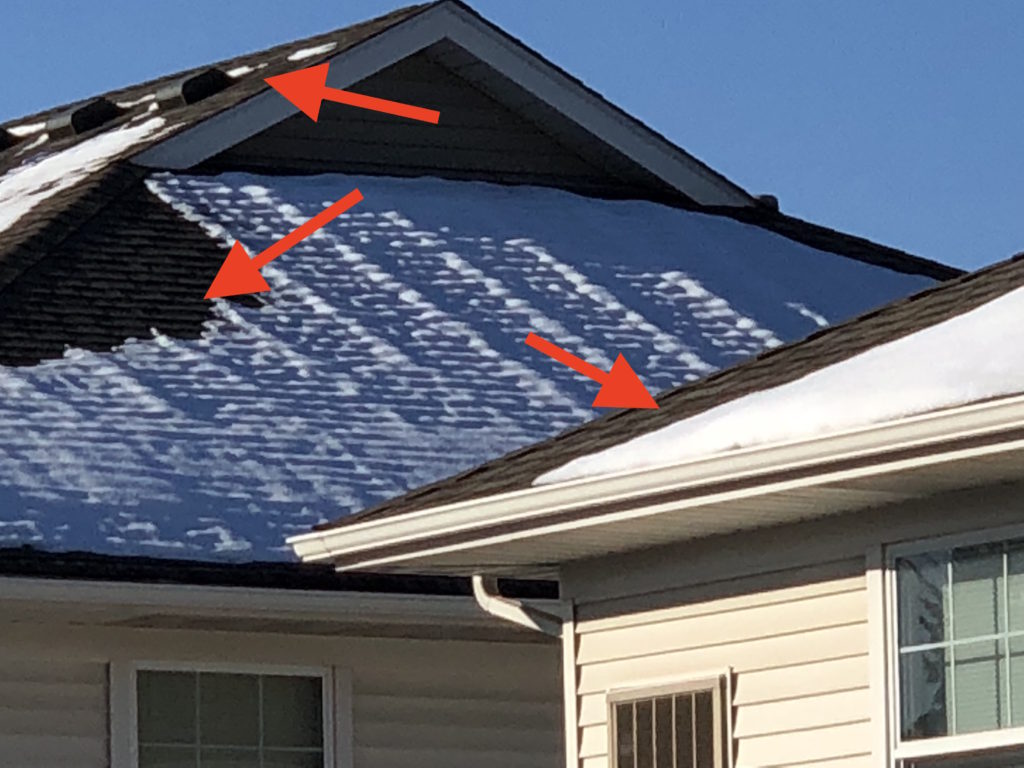
Ice dams are the build-up of ice on gutters and roof eaves from a phenomena known as “heat loss”.
This mound of ice actually acts as a dam by trapping water (from melting snow) on the roof. As snow continues to melt, water begins to build behind the ice blockage, making your home susceptible to water infiltration and serious leaks.
What Causes Ice Dams:
Regardless of what you have read on the internet, ice dams are caused by one overarching factor, heat loss.
What is heat loss? Heat loss is when warm air from the conditioned living space escapes into the unconditioned “cold” attic space. Not only is this bad for your energy bills (think of heating your homes with the windows open), it’s horrible for your the health of your attic.
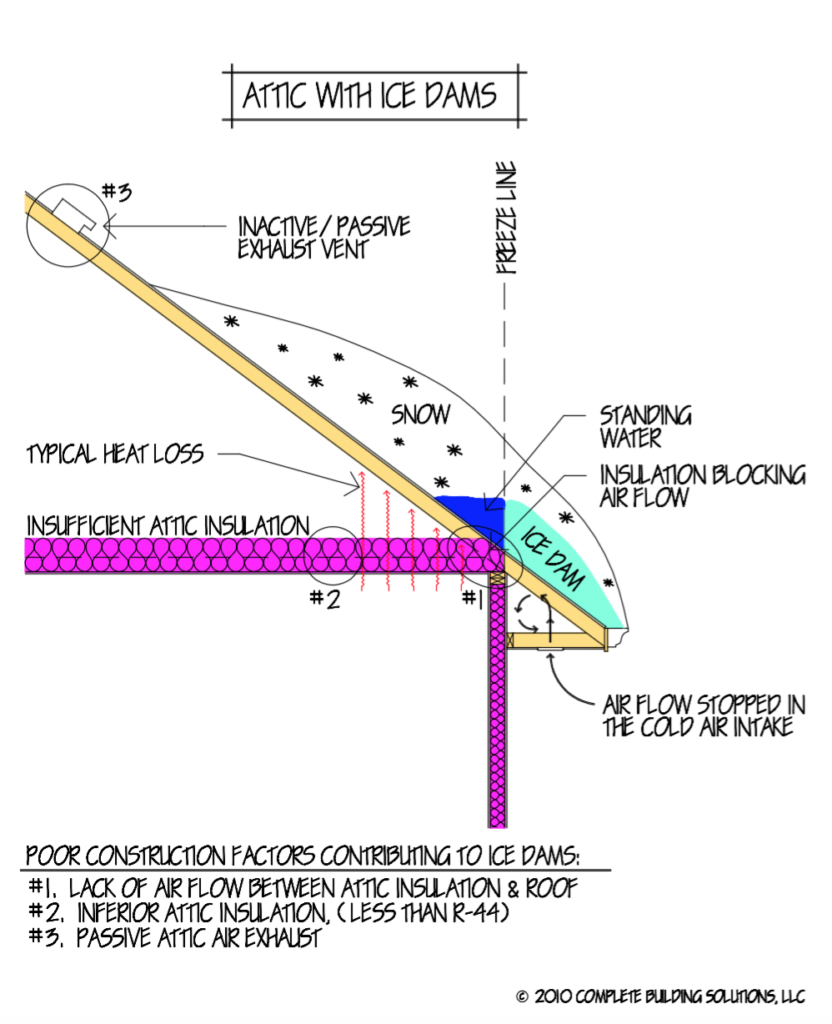
In winter weather, the attic should be a cold space (matching outdoor temperatures) in order to promote the optimal conditions for a properly functioning home.
However, if warm air is allowed to move into the attic, it rises and heats the roof deck. As the roof deck heats, snow on the roof begins to melt, moves down the shingles, and freezes on the eaves or gutters. This process will occur over and over, until an ice dam is formed.
The ice dams themselves can damage your shingles and gutters, but what is more concerning is the water slowly building behind the blockage. Roofs are not designed to handle standing water; they are built to “shed” water.
When water cannot shed, the roof becomes very susceptible to leaks. This is particularly true as ice dams grow and water starts to build further than 6 feet up the roof.
A crucial water protective layer installed on the roof, ice & water shield, is only applied from the gutters typically up the roof only about 6 feet.
So, once water is standing above this layer, it can easily start to move through the roof deck into your attic, framing members, insulation, drywall, etc.
You may be wondering how to tell if you have heat loss in the attic.
Acquiring an attic inspection from a professional with extensive knowledge on thermal break technology is the best way to know exactly what is going on with your attic system.
They will use specialty equipment such as infrared cameras to determine if/where heat loss is occurring. A visual inspection of the insulation, bypasses, and ventilation will also be performed.
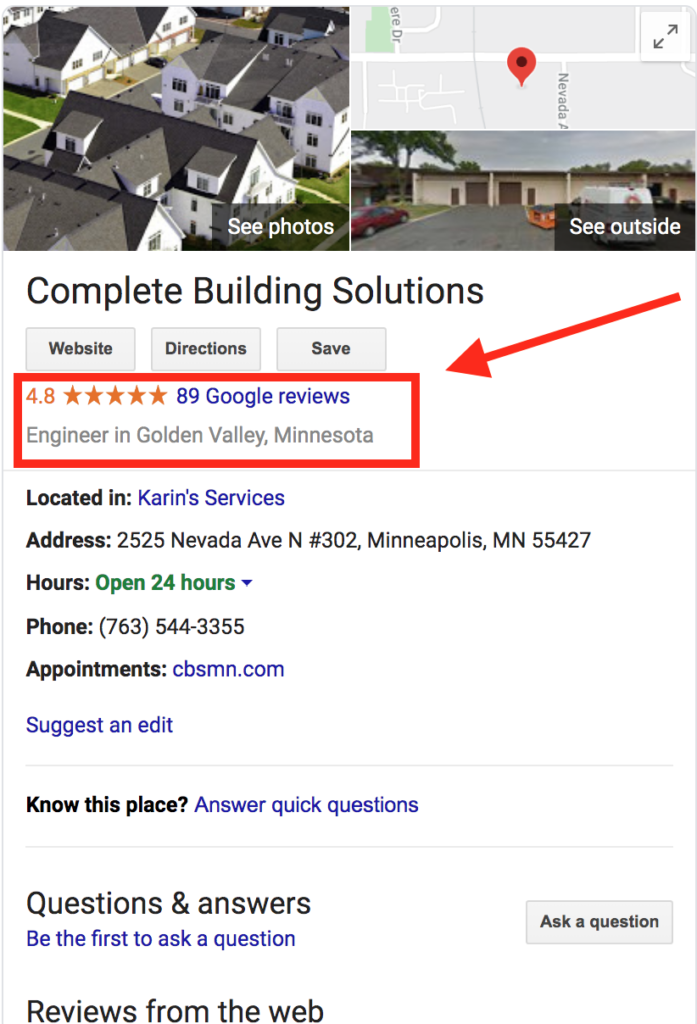
Some structural engineering firms, like Complete Building Solutions, will have knowledge on this, but be sure to ask about the company’s background in building performance and thermal break technology before hiring (most engineers will not specialize in this).

However, as a homeowner there are a few signs to look for if you suspect heat loss.
- Hoarfrost
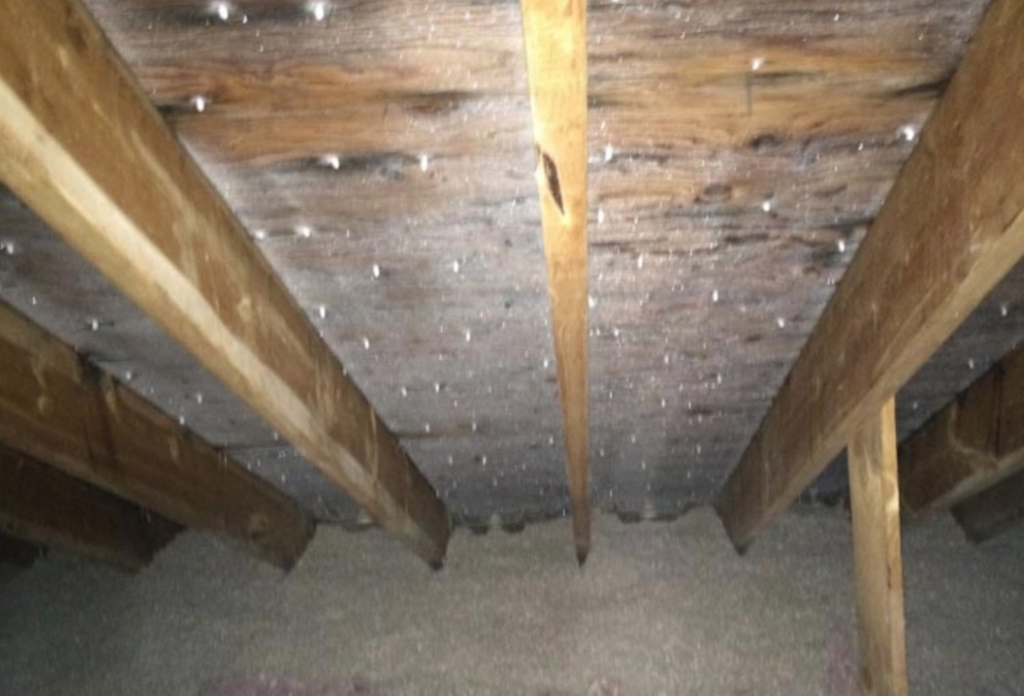
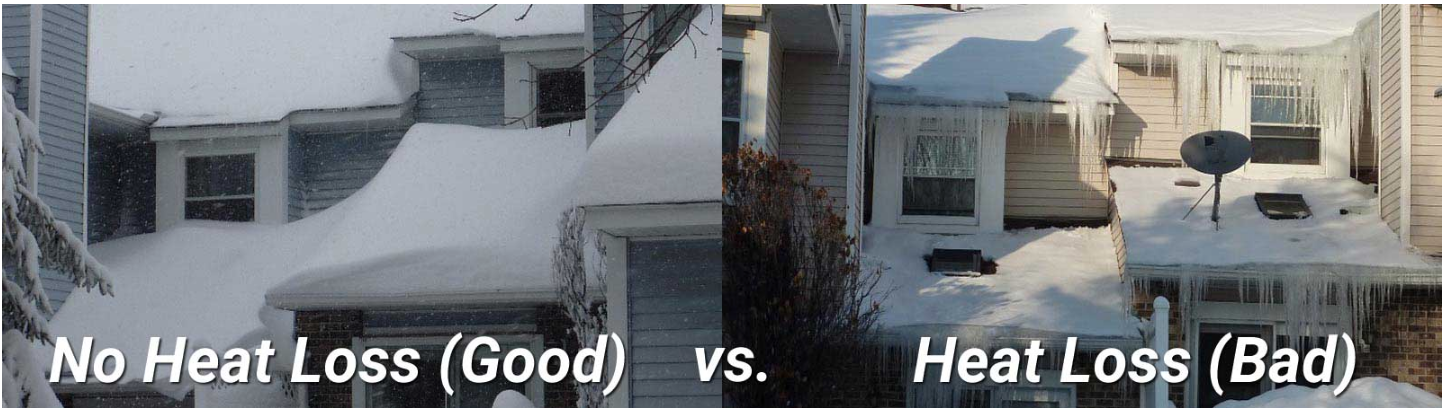
One of the biggest indicators is hoarfrost. Hoarfrost occurs when warm air moves into the attic, rises, and meets the cold roof deck/framing members.
The warm air meeting the cold attic components creates condensation. This condensation will freeze when temperatures drop and melt again when temperatures warm up.
Dripping moisture from condensation is an easy way to damage insulation, create mold, or cause de-lamination of the roof deck.
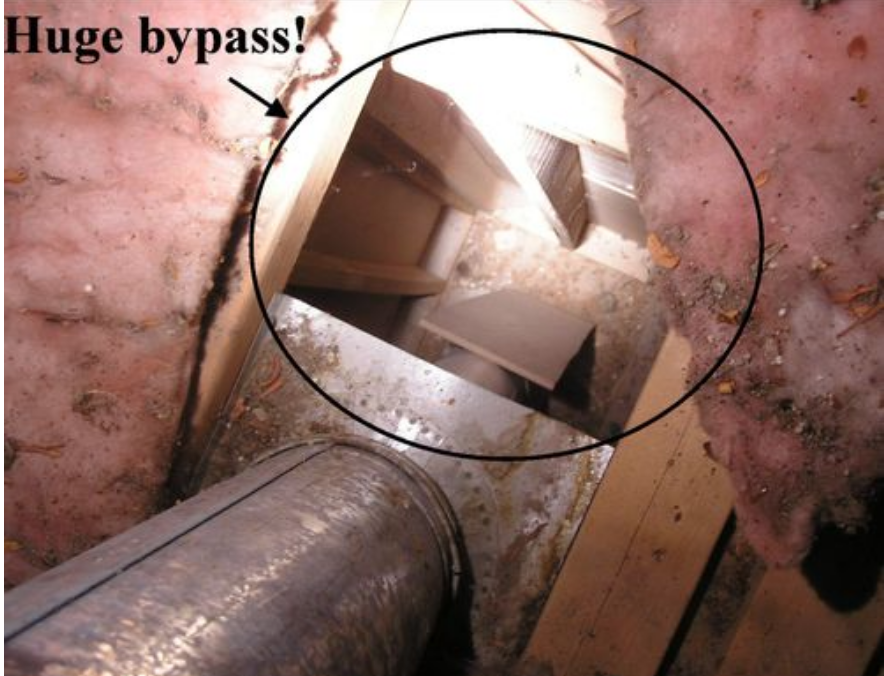
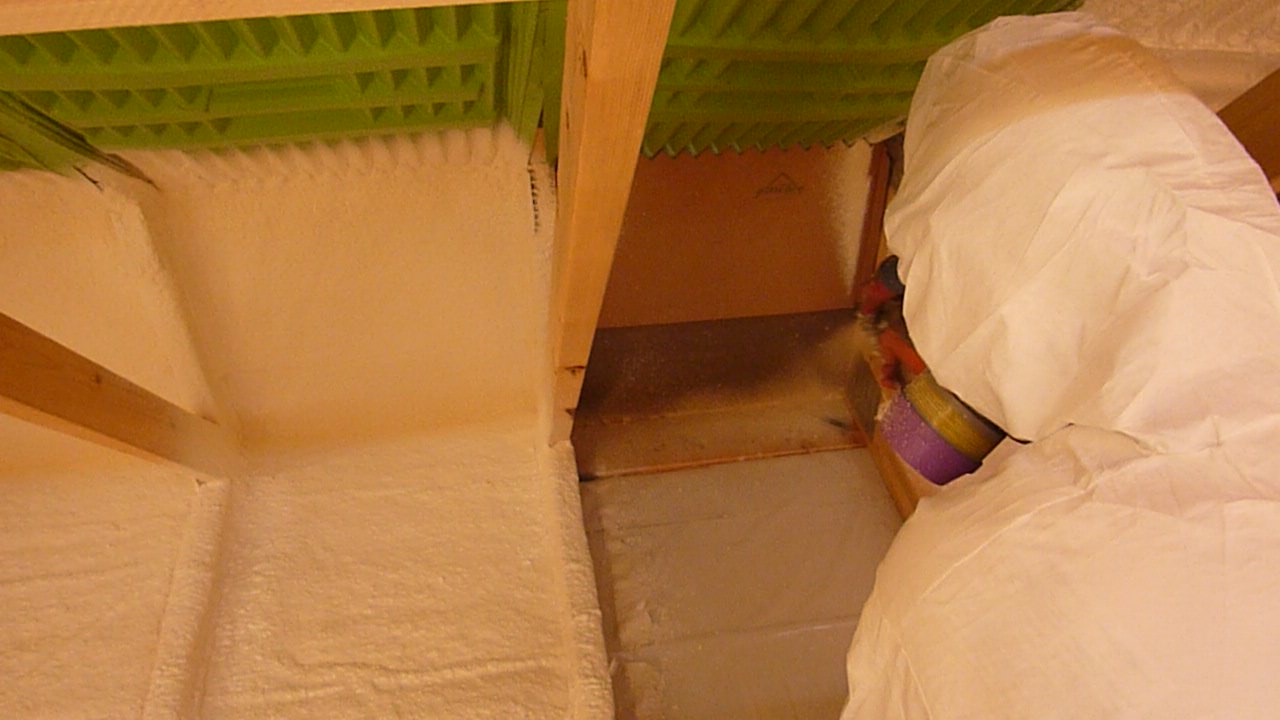
- Open bypass
Attic bypasses are air passages between the attic and the living space. If these are left unsealed (open bypass), heat and moisture from the house is allowed to move up into the attic. These can be hard to spot without proper training, but sometimes you may notice an obvious one like in the photo below. Open bypasses are HUGE contributors to heat loss.
- Lack of Insulation:
An under-insulated attic can definitely contribute to the heat loss issue. If the proper amount of insulation is not present, the current insulation is damaged from condensation drippage, or is flattened out from people walking on it, you may need to re-insulate.
A rule of thumb is that a northern hemisphere attic needs about 16-18” of insulation (this number depends on the region and is really more complicated than this, read on to learn more).
It should lay evenly and not shows signs of moisture, mold or trampling. More on this will come later.
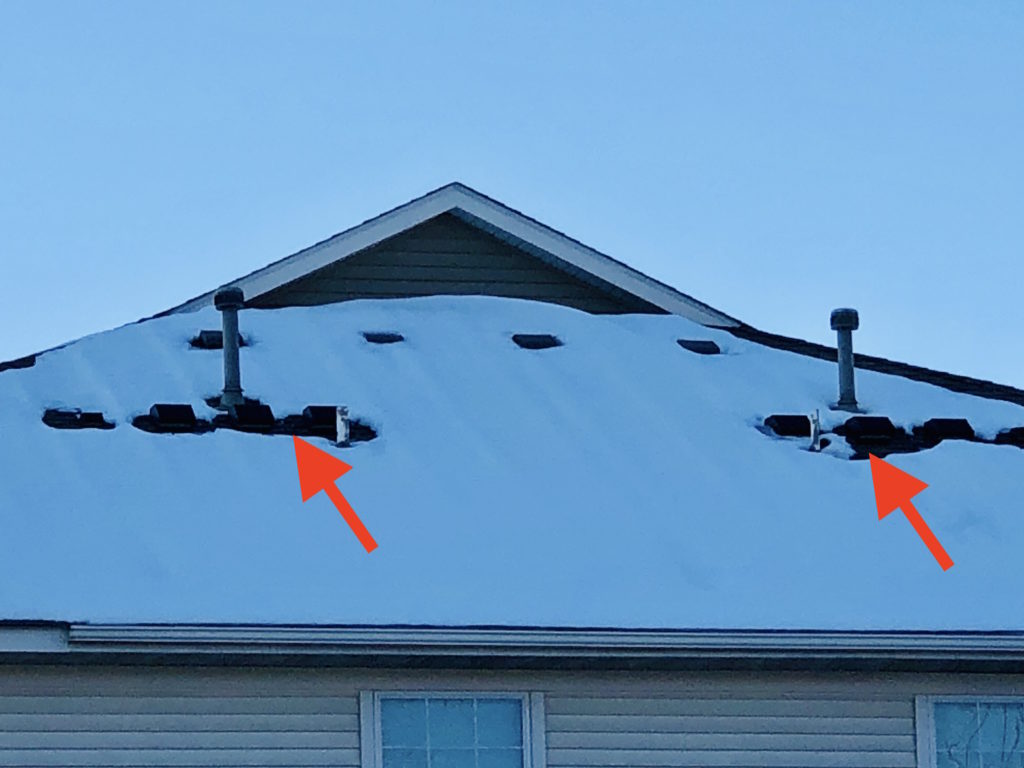
- Uneven snow melt pattern on your roof:
After a frosty morning, go outside and look at your roof when temperatures begin to warm up.
Do you notice an even layering of snow throughout the area or are some areas melting snow faster than others?
If it’s the latter, it’s a clear sign of heat loss.
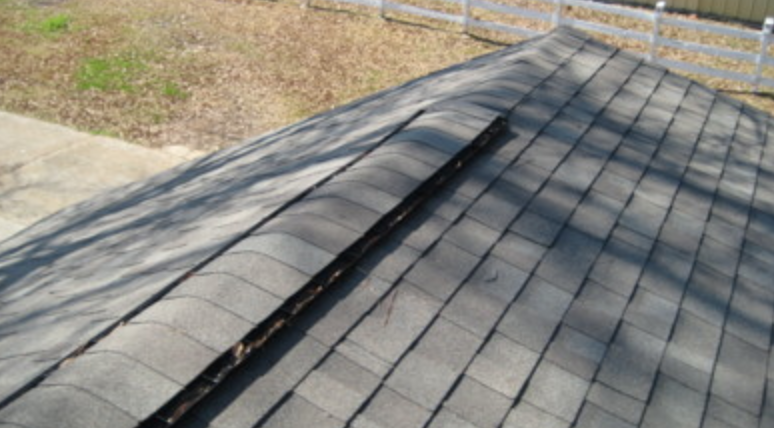
- Dirty Gutters: This one is not related to heat loss directly, but it is something homeowners can look for if ice dams are appearing.
Melting snow needs to freely flow into the gutter so it can be removed from the roof and flushed out of the downspout/extensions away from the home.
However, if gutters are backed-up with debris, water cannot enter. This means the water can start to freeze on top of the gutter and turn into an ice dam.
Ok, so let’s say you have very energy efficient house and heat loss is not the culprit for your ice dams. There is another reason ice dams could occur, fluctuating temperatures.
In order for ice dams to occur, a constant stream of water is necessary to feed the ice build-up on the eaves. This means that there must be a freeze/melt cycle happening.
Optimal conditions for this cycle to occur are when temperatures are slightly above freezing during the day and well below freezing at night. The warmer daytime conditions will melt snow which freezes at night when the temperatures drop back down again.
If fluctuating temperatures continue, do not be surprised if a few ice dams start to pop up.
How to Stop Ice Dams from Occurring Permanently:
Since most ice dams occur from heat loss in the attic, the best prevention method is to address this root cause.
The question to ask is “why is heat loss occurring?”
The answer lies with an inefficient attic system. There are 3 main components which make up the attic system. If these 3 elements are NOT working in harmony with each other, your building’s performance will significantly decrease.
- Attic Bypass

An attic bypass is any unsealed area between the conditioned living space and the unconditioned attic space. It could be things like: chimneys, ceiling light fixtures, heating ducts, kitchen and bath exhaust fans, plumbing, electrical wires, dropped ceilings and soffits.
Not only is it typically a building code which must be followed, sealing these hidden air passages is essential for stopping heat loss. Your insulation alone is NOT enough to keep heat from entering the attic. Because of this, it’s important to have a professional inspect the attic.
- Insulation
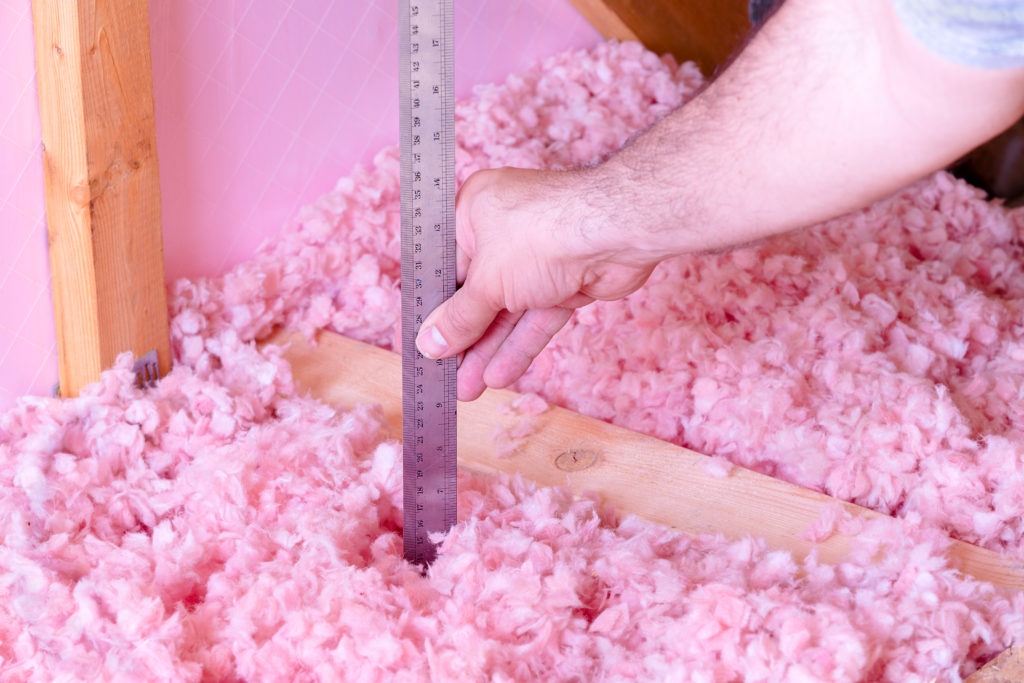
There is no doubt that proper insulation is an important factor to keeping heat where it belongs, in the conditioned living space. How much insulation you need depends on the region you live in. See the chart below. Insulation levels are measured by R-Value which is the material’s ability to resist heat traveling through it.
Energy Star recommends that in the Minnesota region, houses have an R-value of approximately R49-R60.This typically means about 18 inches of insulation spread evenly throughout the attic space.
Remember, simply insulating the attic will not be enough to stop heat loss. All attic bypasses must be properly sealed as well.
Also, if you have noticed hoarfrost in your attic, definitely consult with a pro. Water can actually ruin insulation’s ability to resist heat. Depending on the severity of the water intrusion, you may need to re-insulate or add more.

- Ventilation
A properly installed ventilation system moves cool fresh air into the attic eaves and soffit areas of the roof while pushing hot damp air out of the attic through ridge or exhaust vents.
The goal is for the temperature outside of the attic to be equivalent to the temperature inside the attic.
An interior climate that mimics the exterior environment will prevent moisture from accumulating on the attic components, preserve the integrity of structural members and ultimately promote optimum building performance.
There is a bit of controversy on the best ventilation systems. Our experts, with over 90 years of combined experience, swear by turbine vents for exhaust. These are preferred over ridge vents for a few different reasons.
We have found it takes longer for ridge vents to move hot air out of the attic. Turbine vents are much more capable of keeping stagnant warm air moving out of the attic space.
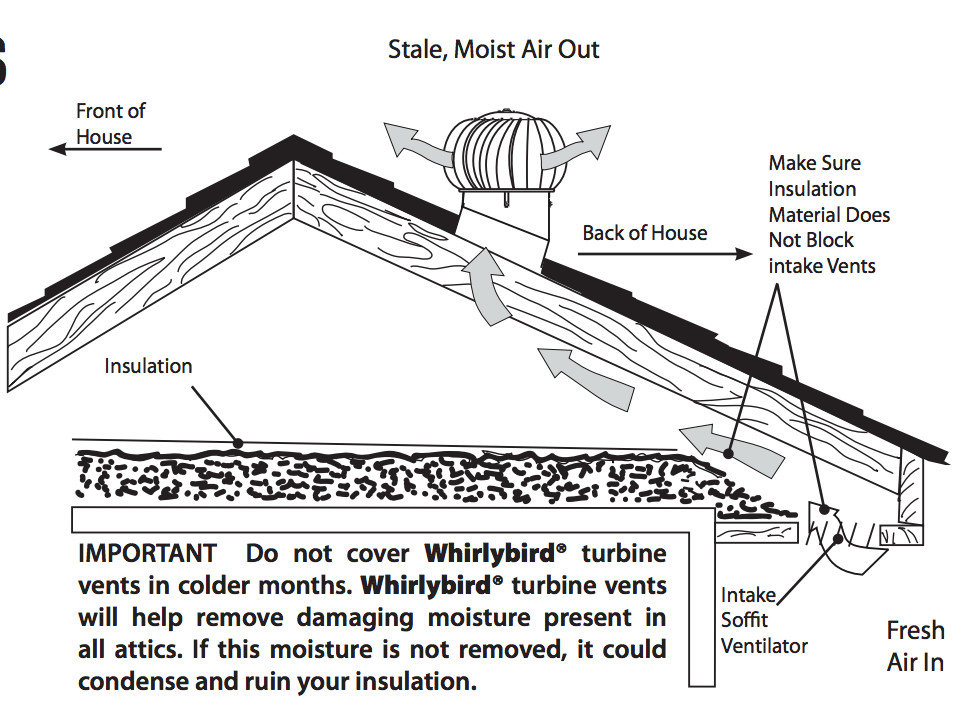
Also, we have actually seen ridge vents that allow air and snow to move into the attic. That is literally the opposite functionality of what they should do and definitely NOT the results you want! When installed improperly, wind driven rains can move into the attic as well. Yikes!

Keep in mind there are certain scenarios when turbine exhaust vents won’t work. This is the case with vaulted ceilings or attics that don’t function as one continuous unit but rather where each truss cavity acts as their own system.
It’s also imperative that your attic has been air sealed when using turbine vents. Your best bet is to do your research and get an expert on site who can get your attic system functioning at peak performance.
Note: In order for your venting system to function properly, it must be clear of snow, leaves, and other debris.
For example, if you notice your vent is completely covered in snow, hire a snow removal company to remove the snow so the vent can function how it was intended.

Let’s summarize.
Stopping heat loss from occurring means paying attention to your attic. Getting an expert on site to address attic bypass, insulation, and ventilation is crucial. This is a long term fix and will stop most ice dams from occurring.
Remember, winters with huge temperature fluctuations may cause ice dams regardless of how energy efficient your attic system is. But, the issue will not be as severe and can be remedied by keeping snow off the roof.
What are Temporary Solutions to Stopping Ice Dams:
If you know heat loss is occurring in your attic, but you are not ready to tackle that project just yet, there are some other options for you.
Ice dams cannot form without…..water. How does water get on your roof? Snow.
When snow melts from heat loss in the attic or fluctuating temperatures, it will move from the peak, down the shingles and freeze on the roof eaves or gutters.
As long as the water keeps melting, it will continue to build until a dam is formed. This dam will grow and water will perpetually build behind it making your home susceptible to leaks.
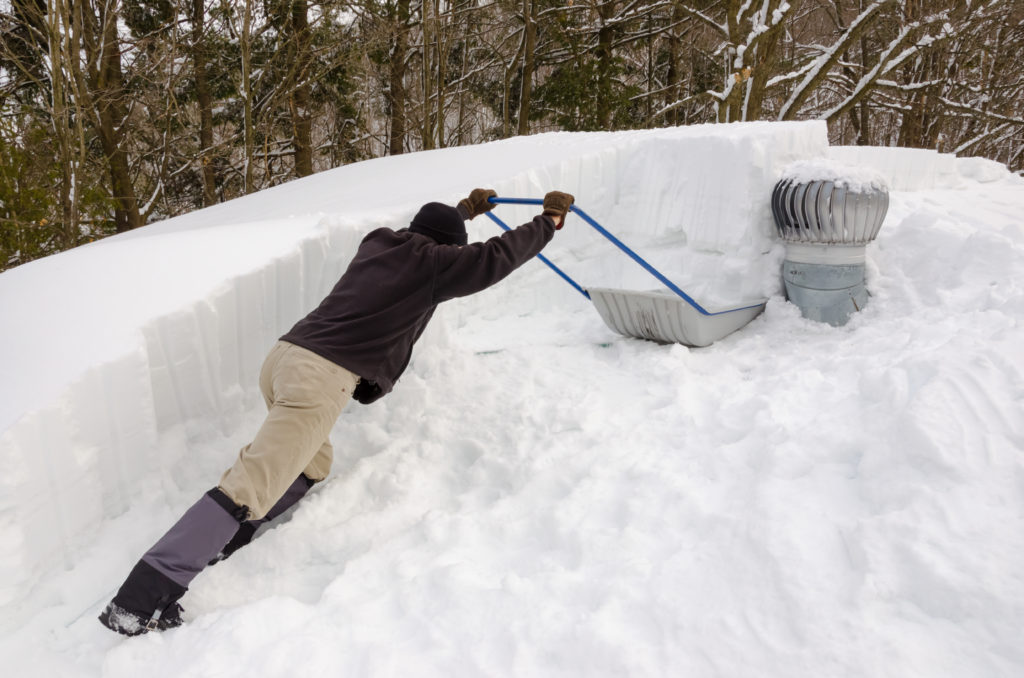
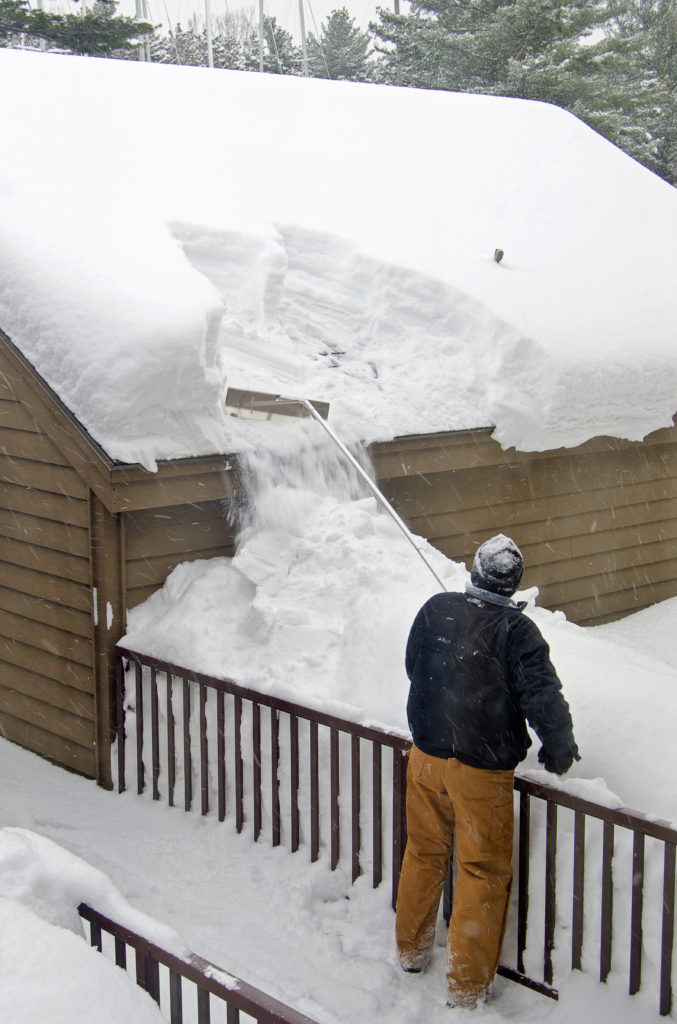
So… the BEST temporary solution is to remove snow from the roof.

There are few ways to do this.
- Rake:
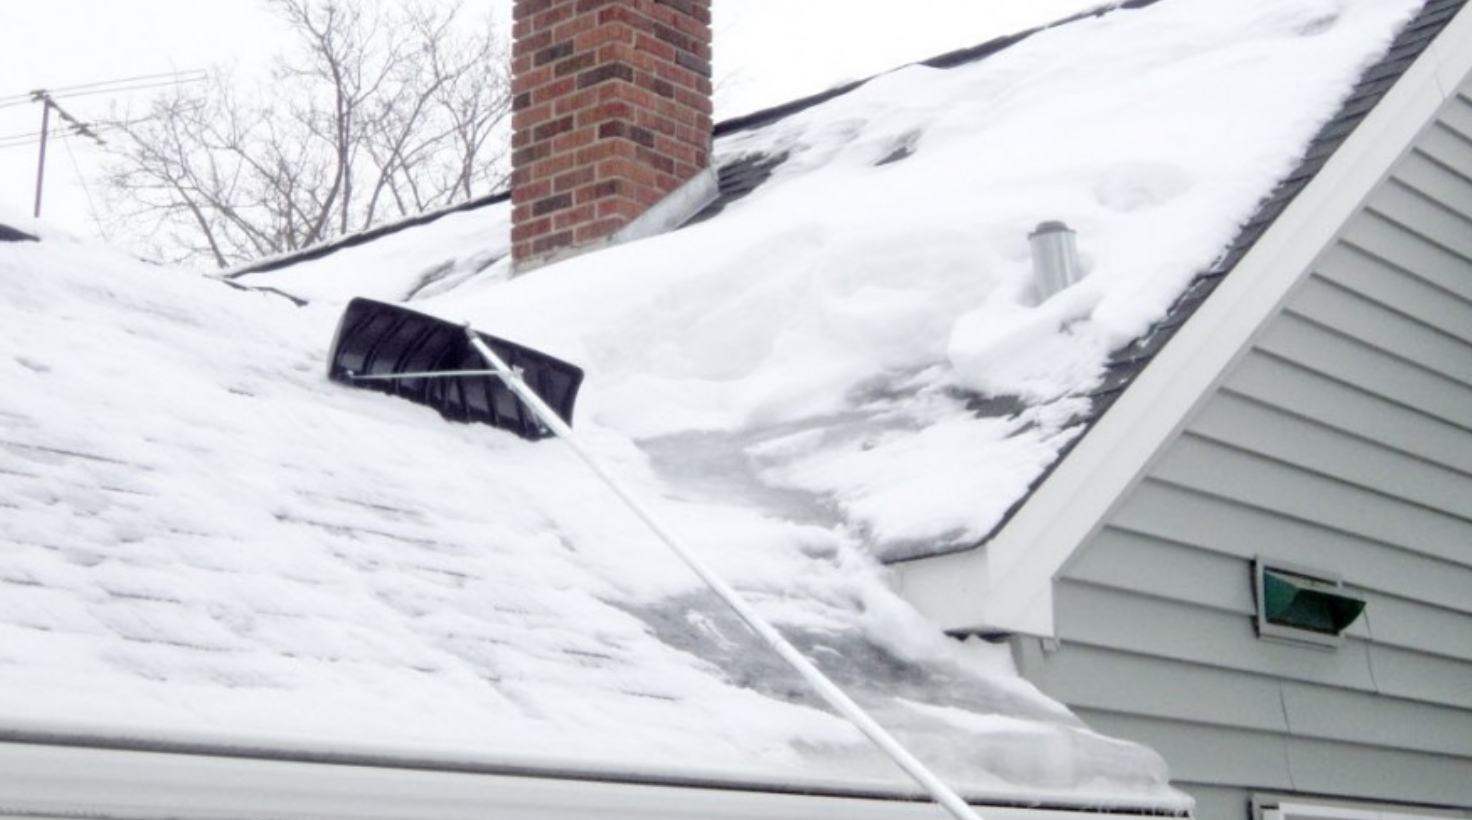
Whenever 2 or more inches of snow is present on your roof, use a snow rake to get it off (try to remove at least the first 6 feet of snow).
Be very careful of icicles, falling snow, and power lines. Also, these aluminum rakes can pull off loose shingles or flashing.
Prior to snow fall, make sure the roof was inspected and any anomalies mended. If everything is intact, the rake shouldn’t do any damage.
- Shovel: We don’t recommend homeowners shoveling their own roofs because it’s dangerous. Snow removal companies have proper safety equipment and knowledge which is why it’s best to hire this out. Also, harsh shovels and tools can do some serious roof damage. Roofing companies will have the proper equipment to keep your roof safe.
And… the WORST temporary solutions are:
- Steam: Do not hire a company that wants to use steam to remove snow and ice dams from your roof. Remember, water is your roof’s enemy, so why use it? This added water can also cause foundation issues especially during winters with lots of fluctuating temperatures.

- Salt: Some people will throw salt pucks or salt filled pantyhose onto their roof thinking it will melt a path threw an ice dam/snow allowing water to drain into the gutter. Just don’t do this.
Just don’t do this.
The problem is that the salt won’t melt the snow/ice fast enough to be effective. Ultimately, you could still end up with water leaks, but this time with salty water leaks. Salt water can cause corrosion to wiring and appliances, leave awful drywall stains, and actually discolor your shingles.
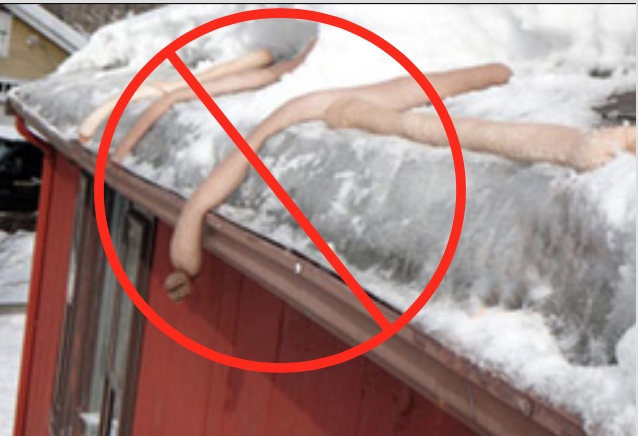
- Heat Cables: These are supposed to work similarly to the salt filled pantyhose method above. And, like the pantyhose method, cables typically can’t melt ice/snow fast enough to prevent leakage. They also increase electric bills and are a fire hazard. We don’t recommend them.
You may be wondering what to do if an ice dam already exists. If this is the case, we recommend that you hire a professional to remove the ice dam.
We could send you up on the roof with instructions on best practices, but why risk it? If done improperly you could severely injure yourself or your shingles.
Side note: Do you know how hard it is to get a roofer onsite to fix a few squares of shingles? No one wants to do it. It’s just not profitable. If you do manage to find someone for shingle repairs, you would probably get charged up the whazoo to make it worth their time.
Tips on Hiring an Ice Dam Professional:
There is a plethora of companies out there claiming to have the best techniques for removing ice dams.
However, many of these techniques can cause further damage to your roof, foundation, insulation, and other components.
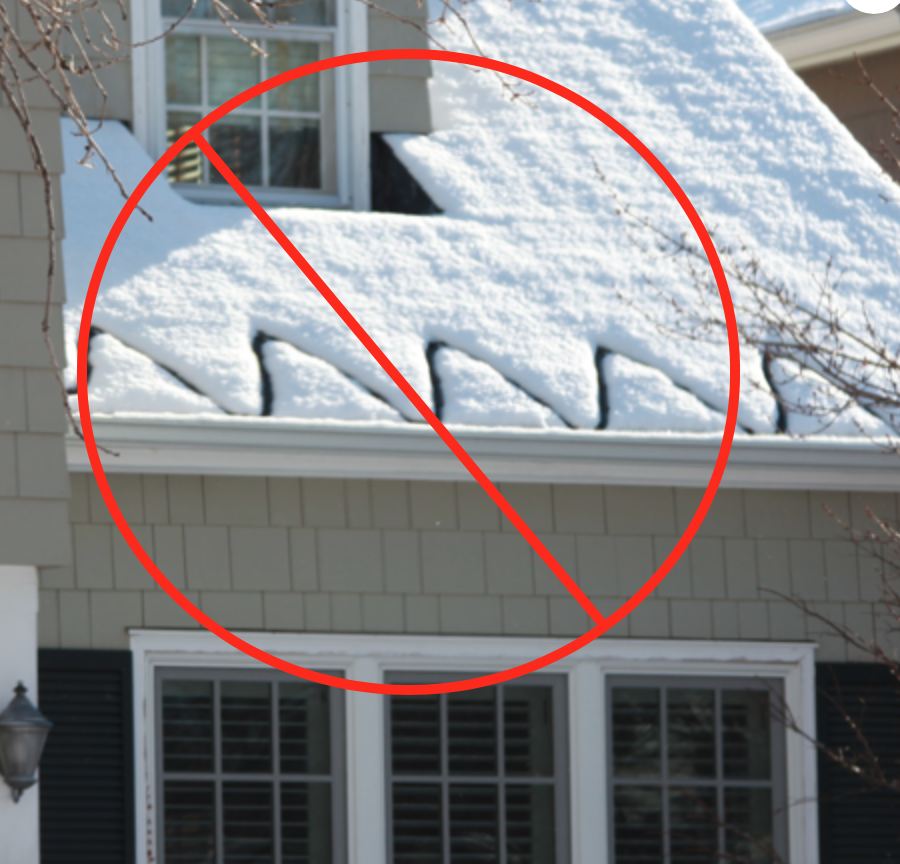
Stay away from companies that:
- Use steam
- Use a high temperature pressure washer
- Tell you to add insulation without air sealing or correcting potential ventilation issues
- Use axes & ice picks
- Use a blow torch (no joke)
- Tell you to use heat cables
Hire an ice dam removal company that:
- Discusses prevention, long-term and short-term ice dam solutions with you
- Offers snow removal services as an ice dam prevention method
- Removes ice dams by gently chipping away at the dam until about 1” of ice is still present. The sun can melt this (as long as snow is continually removed) and will prevent shingle damage from occurring.
- Has great online reviews
How Much Does it Cost to Remove and Prevent Ice Dams?
Most snow removal companies charge by the hour. There is usually a minimum fee for them to even come on site (this doesn’t include any work). You could expect this minimum to be around $75-$80.
The size and pitch of the roof will also affect the price. The larger the roof and steeper the pitch, the more money it will cost you.
In general, most snow removal companies charge about $90-100/hr. Obviously, the more snow load on the roof, the longer it will take to remove, the more money it will cost.
If they are also removing ice dams, they may charge $100-$250/hr. On average, to remove ice dams on a 1700 sq/ft home, it will probably cost you around $500-$700.
This is why we recommend raking your roof whenever 2 or more inches of snow is present. If you can avoid ice dam formation altogether, you can save a lot of money and preserve your roof components.
Ok, by now you should have a pretty good understanding on what an ice dam is, what causes them, how to cure and prevent them, and how to temporarily solve the issue.
If you are sick and tired of dealing with your perpetuating ice dam issue on your single family home, multi-family home, townhouse/condo, or commercial building click here to learn more.