Welcome to the Complete Building Solutions’ guide on how to build a retaining wall!
There are many reasons you may want to build a retaining wall such as:
- Stop or slow down erosion
- Visual aesthetics
- Minimize flooding
- General water management
- Increase usable space in your yard
- Prevent standing water/sink holes
- Legal reasons
Whether you or your contractor are taking on this project, you will want it done right.
It can be a huge headache to fix a retaining wall that is leaning, sloping, or simply falling over.
Oftentimes, it can mean starting completely over.
Yikes! Talk about a lot of work.
This guide will walk you through pre-construction factors to consider, what kind of retaining wall you need, a generic step by step instruction guide on how to build a retaining wall, tools and materials required for the job, and several industry gold nuggets, from a structural engineer’s perspective, that you can use for planning your project.
Ready? Let’s jump in.
Important factors to consider prior to construction:
Building Permits:
Most states and counties will require you to obtain a building permit if:
- the height of the wall is 4 feet in height or greater (measured from bottom of footing to top of wall)
- the back slope is adjacent to the retaining wall
- solid fences are attached or adjacent to the intended retaining wall
- surcharge load conditions exist (a load causing lateral pressure like roads or sloped conditions)
Every state and city has different regulations for retaining wall construction, so it’s always best to check with your town’s building department to make sure you fully understand the requirements.
Contractors:
The complexity of the project and the state/city you live in will determine if a contractor is required to complete your retaining wall project. The best thing to do is to contact your city building department to learn about any special criteria necessary for your project.
For example, here in Hennepin County, Minnesota, the city website provides information about retaining wall requirements. A contractor is NOT essential for both residential walls over and under 4 feet tall (see below).
However, If you have never built a retaining wall before, you may want to consider having a licensed contractor help you with your project. There are many factors that go into building a wall that will sustain the test of time.
Vs.
Zoning Approval:
Some states and/or city municipalities will require that your retaining wall adhere to zoning laws. Call your local building department to know specifically what zoning laws are applicable to your project.
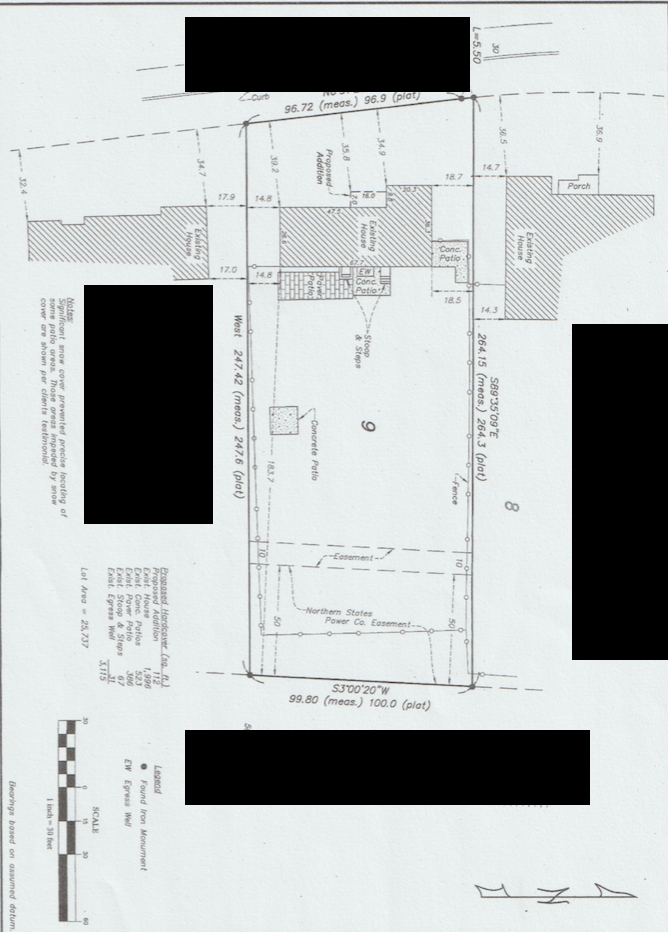
Site Plan: Depending on the complexity and size of your intended retaining wall project, the city may ask you to submit a site plan. A site plan is a general layout of your property and gives building officials an idea of where you intend to build your projects. If your city requires a site plan, you may need to submit two copies and wait for the city planner to approve it before applying for a building permit.
An example of a site plan is shown below.

Inspections:
If your retaining wall requires a building permit, an inspection will be necessary (in most cases). This inspection will verify that your project is compliant with state law, city codes, meets safety requirements, and follows the approved plan.
If a contractor is performing the work, they will schedule the inspection. If you are performing the work, scheduling the inspection will fall upon your responsibilities.
You will not be charged for this inspection; the building permit fees cover this.
However, extra charges may be incurred if an inspector has to make an additional trip for various reasons such as your project did not meet code requirements or work was not completed.
Structural engineers: Most states only require a retaining wall to be engineered by a state licensed engineer if the wall is over 4 feet tall (from footing to the top of the wall) or terraced.
Certain states, like California, will require professional structural engineering if there is a slope at the top of the wall that is 2:1.
Make sure you call your building department to find out if your project will require structural engineering. Knowing ahead of time will really speed up the process.
Determining what kind of retaining wall you need?
Retaining walls serve the function of holding soil behind them in order to prevent erosion or flooding, create an aesthetically pleasing landscape design, or are used to create more usable yard space.
This does not mean that all retaining walls are created the same.
Factors to consider:
- Soil properties
- Elevation and slope of property
- Wall height
The above factors play a huge role in determining what type of retaining wall will be required for your project. When a proper retaining wall design is not implemented correctly, retaining walls may fail.
If you have little knowledge on this subject, it may be best to hire a design team or structural engineer to create a retaining wall plan best suited for your specific landscape and goals.
Source : City of Sparks Community Development Department. “Prescriptive Standards for Design, Installation and Inspection of Rockeries.” City of Sparks, 2017, cityofsparks.us/wp-content/uploads/2017/01/cs-eng-prescriptive-standards-for-rockerywalls.pdf.
Generic step by step retaining wall installation:
Note: The below instruction guide is for a block retaining wall under 4 feet tall. Also, this is a general outline. Remember each project is different and may require unique materials or installation.
Step 1) Dig a trench about 9 inches deep and 20 inches wide at the base of the slope. Make sure there are no utility lines. Note: If the trench slopes, you will have to step up or down to keep the blocks level. Hand tamp the soil and make sure it’s level.
Step 2) Install a 6” base of solidly compacted material such as a type 2 gravel. This is your foundation that will help to hold your wall in place. Again, make sure this base is extremely compact and level.
Step 3) Start to install the first row of blocks, one by one, checking to make sure each block is level with the next. This step is very important and will be tedious.
Step 4) If a drain pipe is necessary (if you have a really tall wall or your paver blocks do not shed water out the front) you will install this behind the block now.
Step 5) Backfill behind each row with drain gravel such as a ¾” rough rock. Pack this down with a hand tamper or 2×4. This is very important.
Step 6) Start laying your second layer of block, staggering the block.
Step 7) Repeat step 5 for each row of block that you lay.
Step 8) Make sure you glue your top layer of block to the wall with a concrete adhesive.
Step 9) Add some top soil to cover the gravel backfill. Your top layer of block should be perfectly level.
Tools you may need:
- Rake – for spreading your base
- Spade shovel – for digging your trench
- Flat nose shovel – for digging your trench
- Digging spike – for digging a trench with rocky soil
- Pick – for digging a trench with rocky soil
- Hand tamper – for packing down your base and backfill
- 2’, 4’, and torpedo level – for leveling your trench and block pavers
- Rubber mallet – to help level your paver
- Caulking gun – for glueing your top layer of block pavers to the wall
Optional- Stakes and string to help with leveling
Materials for retaining walls:
Choosing materials is an important part of building your retaining wall.
Are you looking for the most cost effective option? Do you want a natural look? Are you wanting a quick and easy install?
Knowing what features are most important to you will help you select the best materials for your project.
Below is a list of factors to research and contemplate to help you with your purchasing decisions:
- Price
- Material strength
- Durability
- Design options
- Aesthetics
- Complexity of installation
- Green products
- Drainage capabilities
So, once you have determined what the most important features for your project are, you can start to compare products.
Here is a list of the most common materials used for building a retaining wall:
- Concrete block– This is a great modern option for retaining walls under 4 feet tall.
- Stone veneer– Can provide you with a natural look and several stone color options. However, this is not a DIY project. You will want to hire a structural engineer to engineer this type of wall.
- Poured concrete– If done correctly, this will make for a very strong and durable wall. However, if poor workmanship is done it can lead to bulges, cracks, or waves in the concrete.
- Brick- Brick is very aesthetically pleasing, eco-friendly, and durable, but is labor intensive and requires a strategic drainage plan.
- Wood- Some people like the natural look of wood and the fact that it is fairly easy to install. It is best used on walls under 4 feet tall, and may last about 20 years or so if properly installed with a vigorous waterproofing system.
- Boulder- What is more natural than boulders when looking for a solution to grade changes? These boulders are easy to obtain and come in many colors. They are also very durable when installed with a solid water management plan.
- Gabion- A gabion is a very “old school” style of wall that can be used with any type of recycled material. The eco friendly citizens appreciate this feature greatly. These walls are easy to install but have been known to rust easily and are vulnerable to water.
- Natural Stone- Natural stone would be a go-to choice for many because of its classic look and durability. But, many will shy away from it because of the hefty bill, labor-intensive install and potential drainage issues.
- Limestone- Limestone is certainly one of the more unique choices among retaining wall materials. It’s varying layers of shell, coral, algal, and skeletal debris initiates a time out of mind experience for many. It’s low maintenance, but is susceptible to chemicals and staining.
- Segmental retaining wall- Segmental retaining walls are a fabulous solution to keep slopes from caving, slumping, sliding when the grade of slope is larger than 45 degrees. These types of walls require an expert, such as a structural engineer, to ensure a waterproofing system and geogrid is installed correctly.
Well, that’s it.
We hope you learned a few things about how to build a retaining wall. When it’s all said and done, make sure you know what you are doing before taking on a retaining wall project.
These projects are labor intensive for one person and costs add up quickly. Because of this, you want to make sure the project is done correctly, the first time. Once a retaining wall fails, corrective action can cost almost as much as it was to install the wall in the first place.
If you have any questions about your existing retaining wall or upcoming project please call Complete Building Solutions at 763-544-3355.


