Diamond piers are an excellent footing option for decks, porches, walkways, stairways, pergolas, gazebos and other accessory structures. They are easy to install, can be utilized in many soil types and are strong enough for some of the most demanding conditions.
To learn more about diamond piers and if they are right for your project, please read on.
What Is A Diamond Pier?
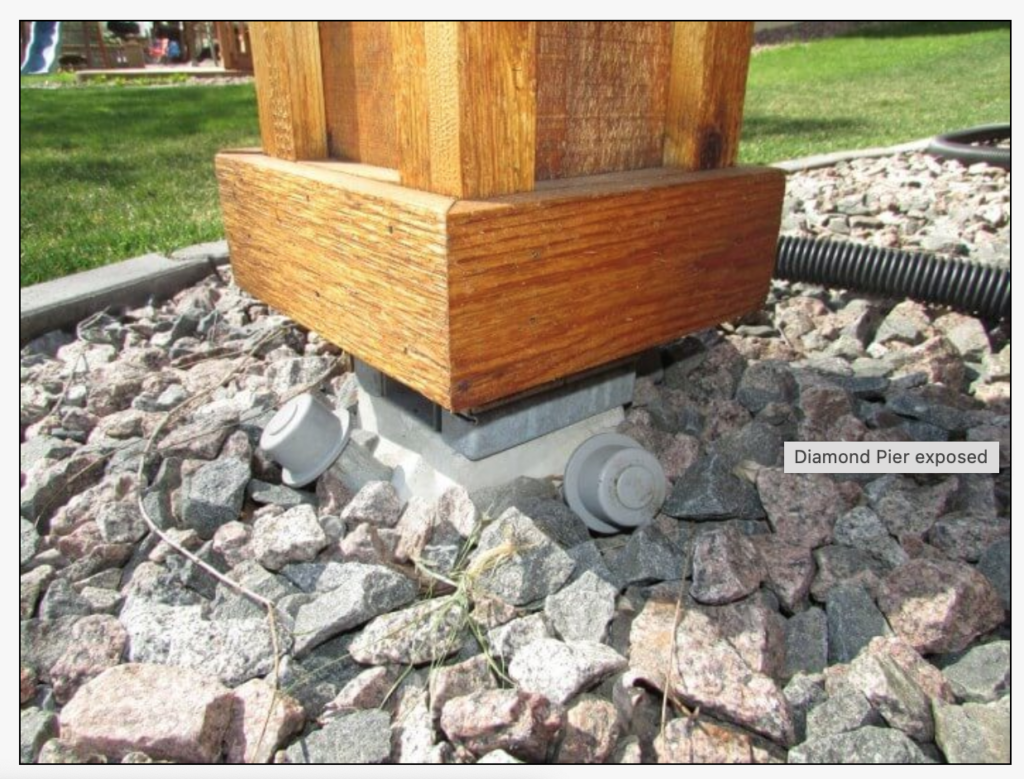
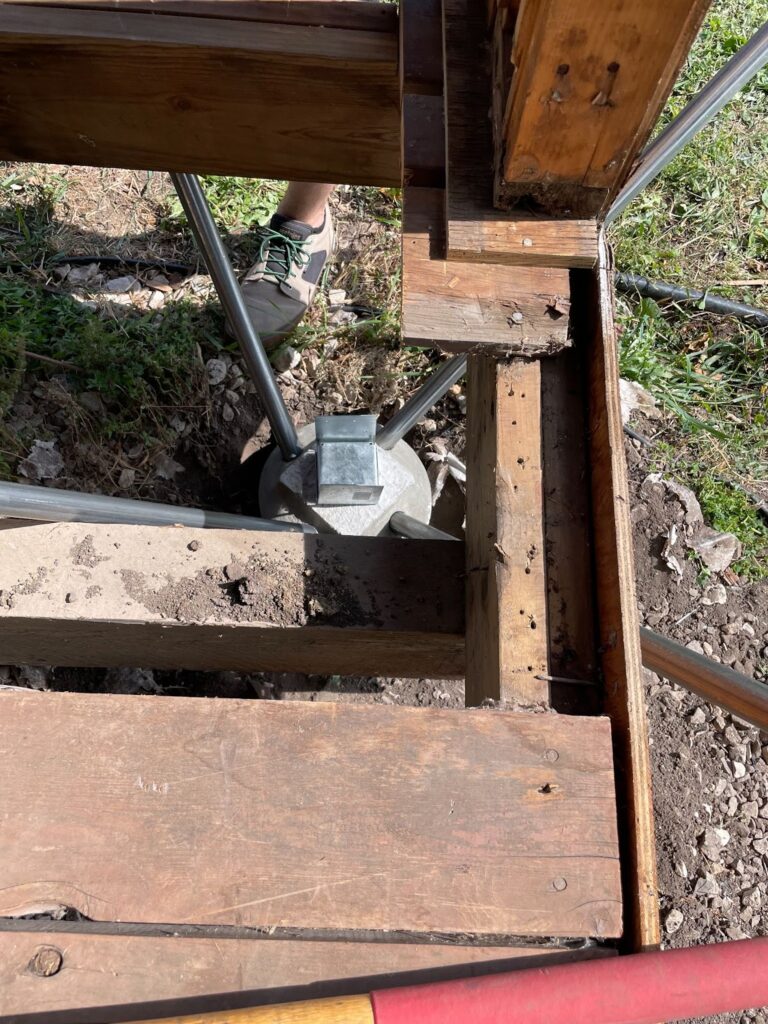
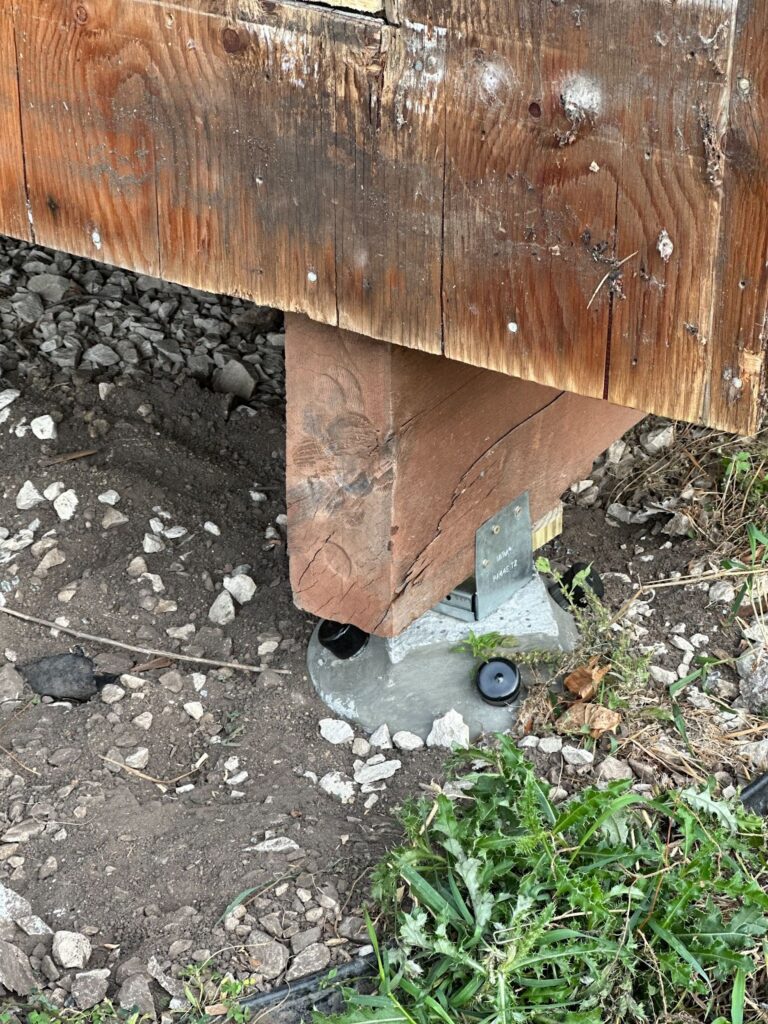
Diamond piers are a type of footing that utilize pin pile technology and consist of a precast concrete head with 4 holes for short bearing pins to be driven down into the soil. Essentially, the concrete block is placed into position and four pins are driven into the earth at 45 degree angles with a handheld tool. The benefit here is that installation is very simple, no excavation is required and the existing soils are hardly disturbed. Traditional footings may disperse loads more efficiently, but in the process, soils are disturbed and weakened. Diamond piers work similarly to a shallow foundation and tap into the strength the earth’s soils can provide.
How Diamond Piers Work?
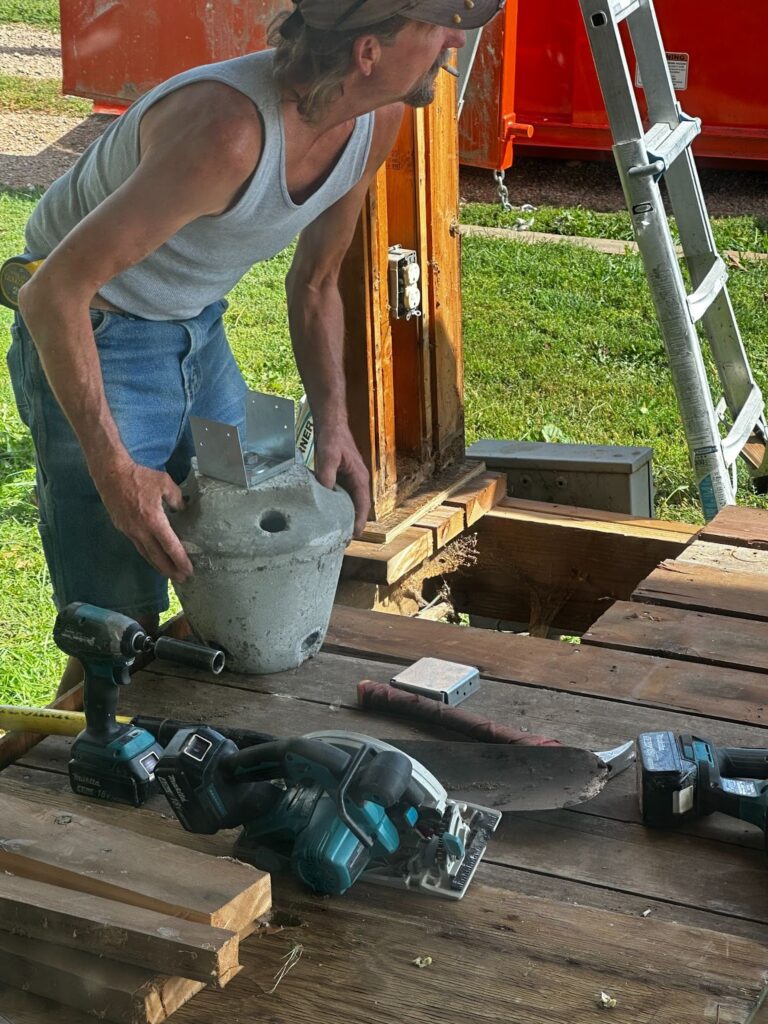
In order to understand how diamond pier footings work, let’s think about tree root systems. Tree roots expand deep and wide into the earth’s soils in order to help to stabilize and anchor a tree. Diamond piers transfer building loads through poor/unstable soils down into more stable soils and also help transfer the load over a greater area of space. Because the pins are drilled at an angle, they cover a larger bearing area than a conventional concrete footing. Once the pins are drilled, they are locked into place. The weight sitting on the concrete head helps to prevent movement and heaving.
Types Of Projects Diamond Piers Are Used For

Diamond piers are frequently used in smaller projects such as: pergolas, gazebos, decks, porches, stairways and walkways, boardwalks, solar panels and occasionally, tiny homes.
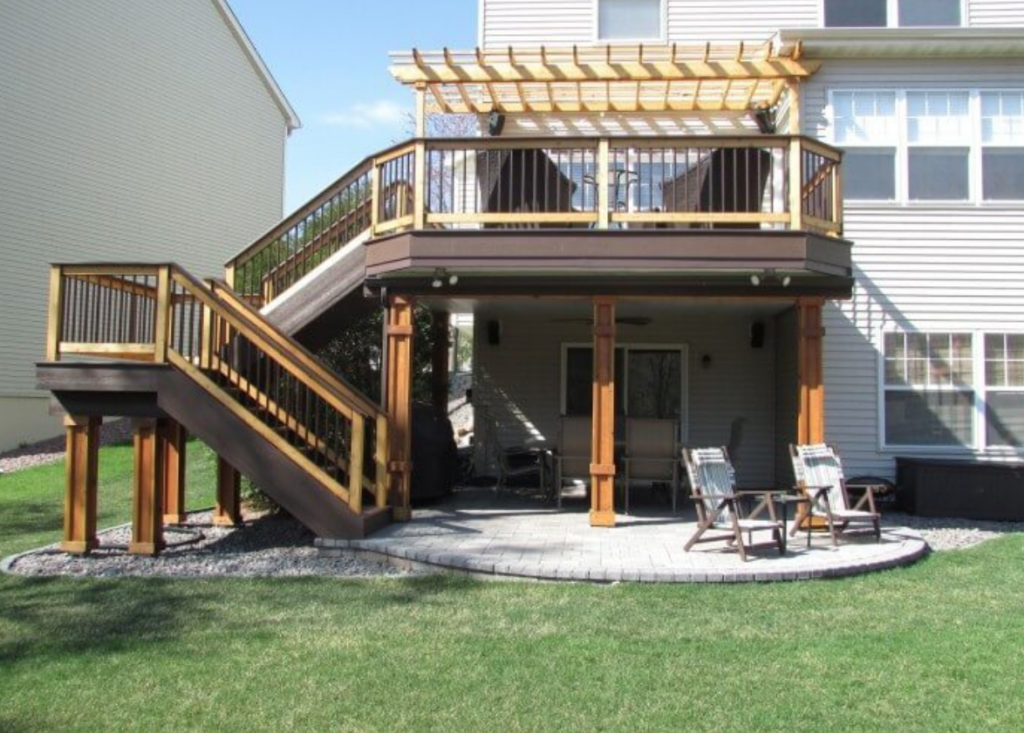
They are a favorite foundation system of many contractors because of their convenience and ease of installation; excavation and hand hole digging are NOT necessary. Another perk is that there is no hole inspection needed, so many project delays are avoided.
We know contractor’s love these products, but so do homeowners. No one wants their yard ripped up over a deck or pergola. Diamond piers are literally placed into position on the soil and a hand held tool drills the pins into the earth. No mess.

Diamond piers can also be used in various soil types such as: silts, clays, sand and gravel. They are a great option for many walksways on sandy soils as well as in cold northern climates since they do hold up well against frost heave.
As always, it’s a good idea to consult with your structural engineer to ensure that diamond pier footings are a good fit for your project.
Load Bearing Strength Of Diamond Piers
Diamond Piers are built to handle significant structural loads. Their engineering ensures a stable foundation capable of supporting decks, sheds, pergolas, and small buildings. For example, the DP-50 model can support up to 5,000 pounds, depending on soil conditions.
To ensure the right pier for your project, consider your structure’s weight, local soil type, and building codes. Whether you’re building a basic platform or something more substantial, Diamond Piers deliver dependable performance.
How To Know If Diamond Piers Will Work For Your Project?
First off, it’s important to have a structural engineer involved any time you are installing footings or a foundation. Most building departments will actually require a structural engineer’s stamp of approval on your design prior to a building permit being released. With that being said, we will provide you with a few tips and tricks to know if diamond piers will work for your project.
- Soil conditions- This is an extremely important factor to consider with any foundation design. Any diamond pier sold in a retail store was designed to work in sound soils. If you want to know what the IRC defines as a sound soil, check the International Residential Code (IRC) Table R401.4.1. See below.
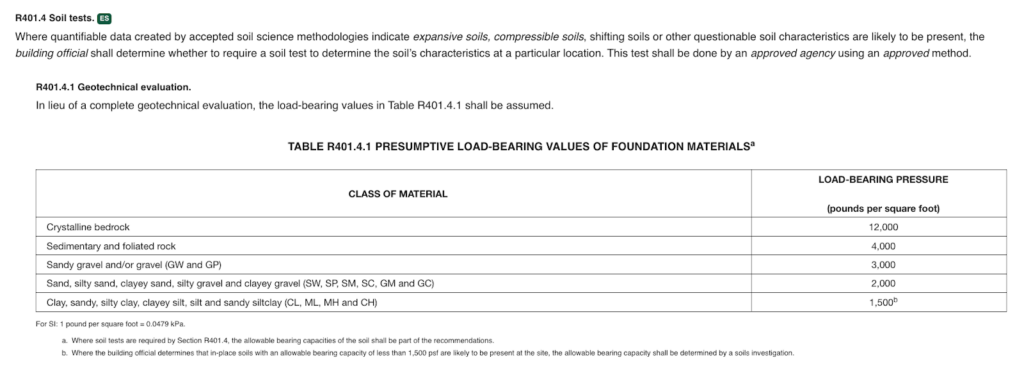
The chart above dictates soil bearing capacity for various soil types. For more information on what soil bearing capacity is, click here.
It’s very common for projects to be built on sand and clay soils. As you can see, sandy soils must have a minimum bearing capacity of 2000 psf and clay must be at least 1500 psf.
If your soil does not meet local code requirements or the presumptive bearing capacity is in question, you may need to obtain a soil test. If you are looking for information on your project’s soils, check with your local code official or check the U.S. Geological Soils Survey website here.
On another note, not all soils will be suitable for diamond pier footings. For example: soils with a bearing capacity under 1500 psf won’t be considered, highly expansive, shifting or sliding soils, slopes greater than 27 degrees, or contaminated soils will also not work. Proceed with caution if dealing with soils at the edge of a body of water or in tidal zones.
In these cases, you should speak with your structural engineer to determine the correct plan of action.
Another crucial component for a lasting foundation is water management.

Water can severely weaken soils or cause frost heave.
Here are a few essentials to keep water from devastating your foundation (diamond pier or other).
- Standing water next to the foundation must be dealt with
- Downspouts and gutters must properly shed water away from the foundation
- Landscape borders trapping water near the home should be removed
- Improperly backfilled soils around a foundation may need to be removed and replaced with proper soils.
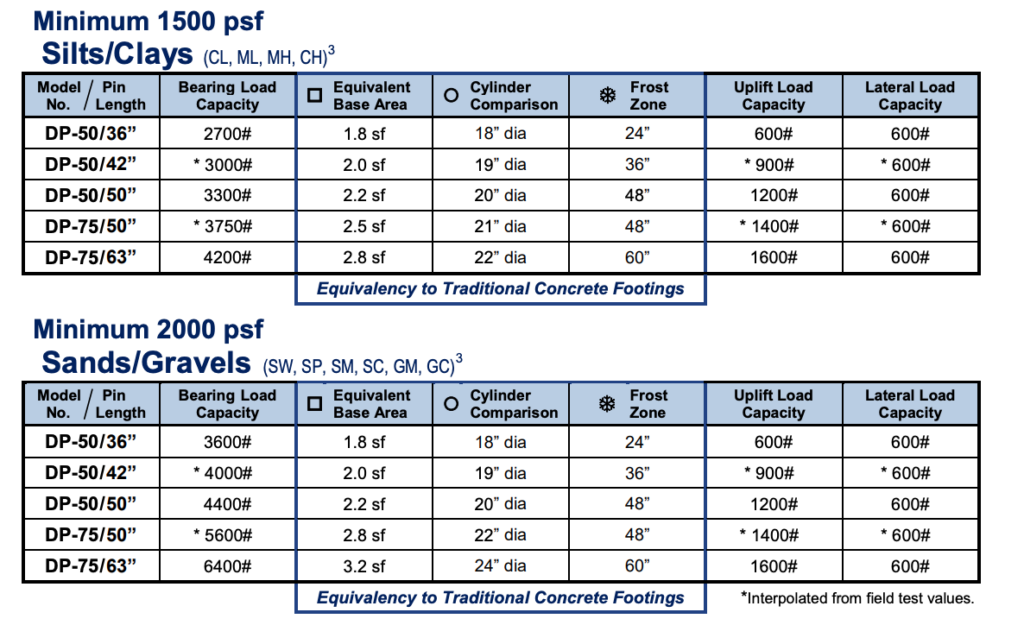
- Loads- Once you have determined what kind of soils and elevations are present on your building site, it’s time to think about loads. Again, this is something your engineer should be handling. Your engineer will look at the soils present and the intended load of the structure to be built in order to design (insert large math equations here) the appropriate footing size. They may utilize various load tables such as the diamond pier load chart below.
- Speak with your local building department- It’s important to speak with your local building department authorities and find out any specific requirements for obtaining a building permit. More complex projects may have additional or unexpected steps in order to become code compliant.

Get a free quote on your project!
Ready to start your project? Reach out to Complete Building solutions and get a quote absolutely free.
Benefits of Diamond Piers Compared To Traditional Foundations
Diamond Piers offer clear advantages over traditional foundation systems like concrete footings or helical piers. With Diamond Piers, installation is completed in a matter of hours rather than days because there is no need for excavation, concrete pouring, or waiting for curing.
This significantly reduces labor costs and minimizes disruptions to the surrounding site. The pin driven system streamlines the process and provides a reliable, load bearing foundation without the complications of heavy machinery or extensive site preparation.
Diamond Pier Costs

Diamond pier footings may cost you between $150-$230 per footing. Although the footings themselves tend to cost a bit more than traditional footings, the cost savings on excavation and labor are huge. Certain lumber yards will even lend you the driving bit for free if you purchase the materials through them.
Diamond Pier Driving Bit

A diamond pier driving bit is a specialized tool made for driving the pins of diamond pier footings. It is used in conjunction with a breaker/demolition hammer. The driving bit has a 1-⅛” hex shaft.
Remember, the diamond pier pins should initially be tapped into the soil (approximately 6-12 inches deep) with a sledge hammer in order to stabilize the pins. Once this has been accomplished, the diamond pier driving bit can be used with the demolition hammer to drive the pins down into the earth.
Diamond Pier Caps And Inspection Plugs
We have found that people tend to get confused on what a pin cap is. In essence, diamond pier pin caps are UV-resistant vinyl caps that cover the top ¾” of the bearing pin that sticks out above the concrete head. See the photo above.
This is different from the inspection plug (also known as a tip). Inspection plugs are the plugs inserted into the bottom of each bearing pin prior to installation. The purpose is to keep soil and debris from lodging inside the pin as they are driven into the soil. Since the pins are hollow, the contractor and building inspector are able to send a measuring tape down the pipe to verify the length.
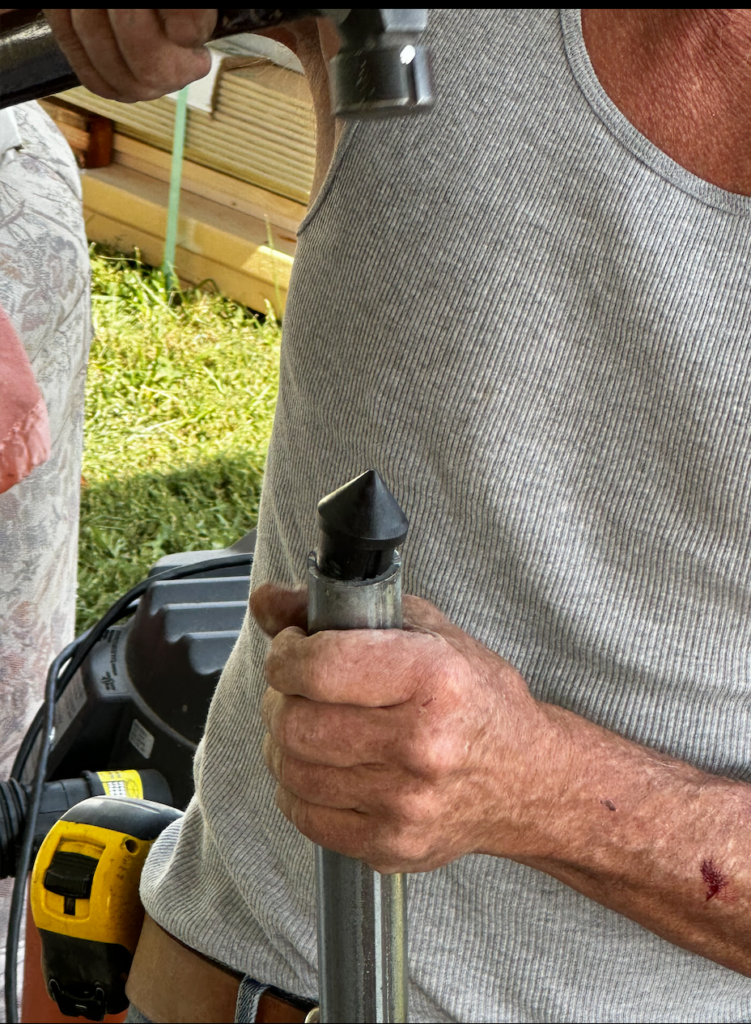
Pin cap installation-
- Once the concrete head has been set with all 4 bearing pins installed,the pin caps can loosely be placed on the ends of the pins.
- At this time, the brackets, posts/beams and frame should be set and the supported structure completed.
- When all framing materials have been loaded, it’s time to pull the caps off and check the length of the pins extending. If the pins have shifted upwards, they can be tapped with a small sledgehammer (for specifics check the installation guidelines).
- Once the field inspection is complete, tap the caps down firmly with a small sledgehammer to set them against the concrete.
Note- If you’re struggling to get the caps to stay on, the pin ends should be inspected for damage incurred during driving. It may be possible to file off blemishes to restore the original diameter.
Inspection plug (aka inspection tip) installation-
- Line up the notch in the tip with the weld seam inside the pin and tap it firmly with a hammer into the pin. 4
- It doesn’t need to go in all the way, just enough to block dirt from moving into the bearing pin.
Diamond Pier Kit-

Various retail stores will carry diamond pier kits. For example, Home Depot actually charges $235.00 for: 1 concrete head, 4 pins, 4 caps and 4 tips. If you are looking for a retailer in your area, click here.
Diamond Pier vs. Concrete Footing-
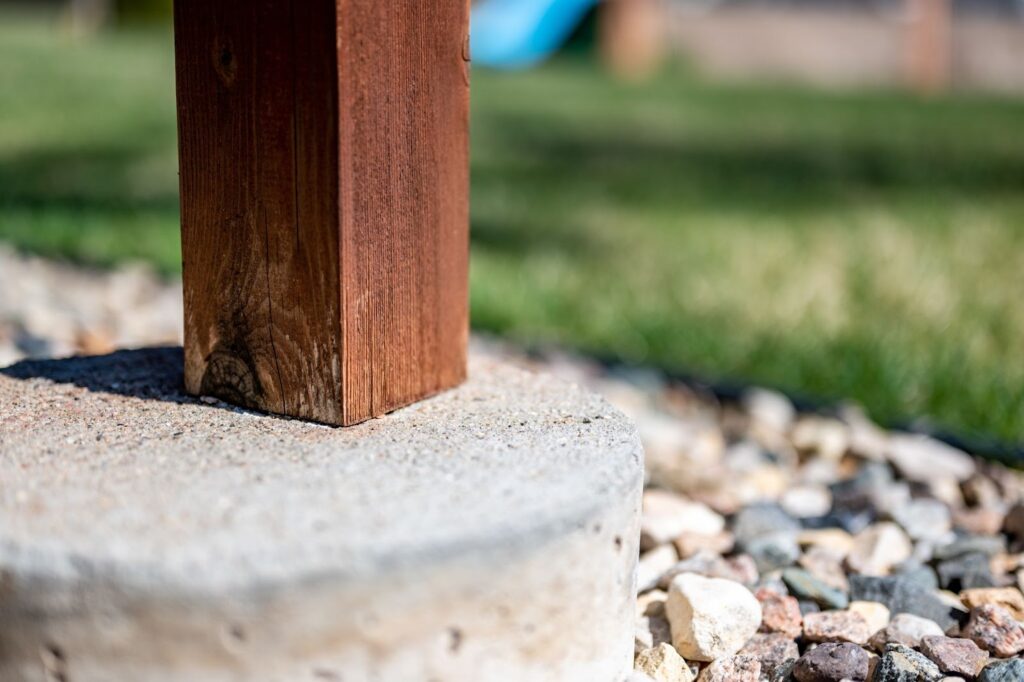
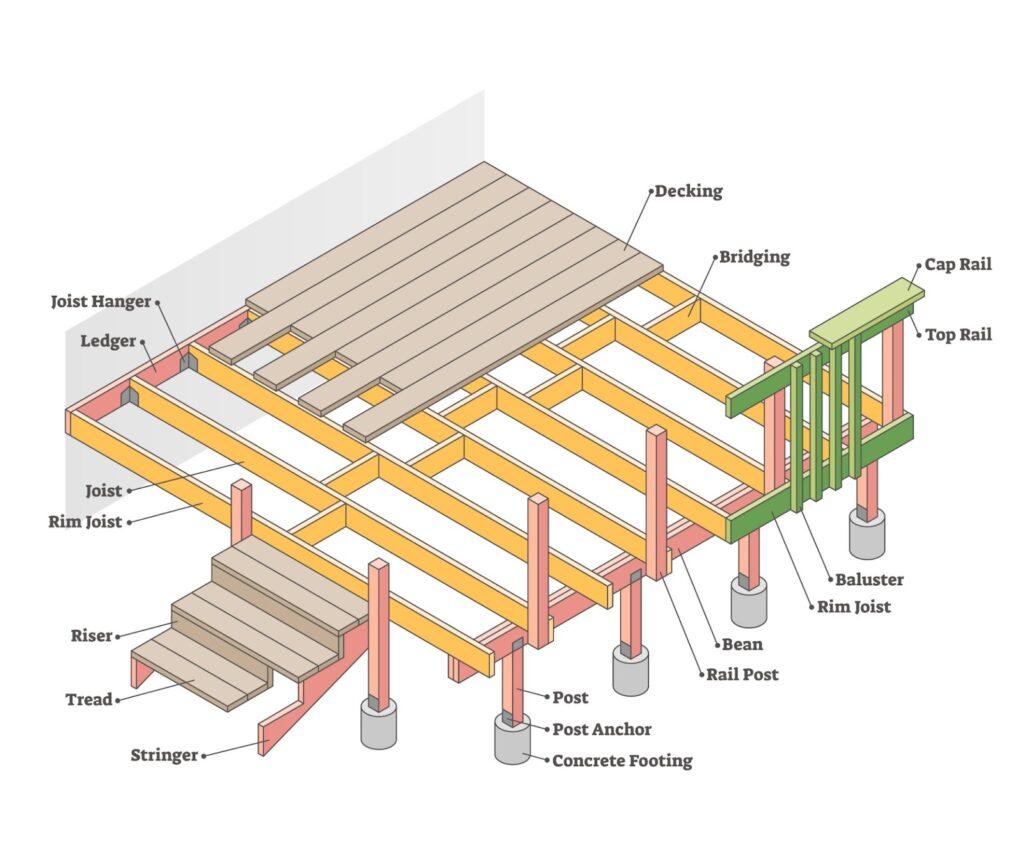
Diamond piers were introduced to the residential market in 2002 and hit the Minnesota scene around 2007 with great success. When it comes to small residential projects like porches, decks, and walkways, these footings really are a no brainer.
When compared with traditional concrete footings, diamond piers standout because they are:
- Easier to install
- Require no digging or excavation
- Only need handheld tools
- Come with a precast concrete head
- No curing time
- Handle frost heave better
- No hole inspections needed
- Take approximately 30 minutes (or less) per footing to install
- Can start same-day framing
All in all, diamond piers just make sense when compared with traditional concrete footings. They save money, time and hassle. However, always speak with your structural engineer regarding the best footing options for your specific project.
Diamond Pier vs. Helical Pier-
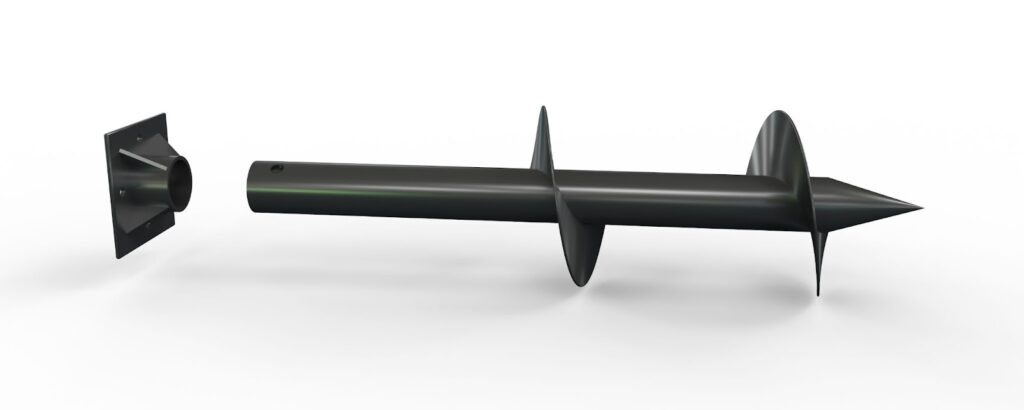

There is a time and a place for both helical piers and diamond piers. However, if you want simple, fast and strong, diamond piers are the way to go. The installation process is so simple that even helical piers can’t compare. Keep in mind that diamond piers are meant for carrying lighter loads; think 2000-6000 lbs.
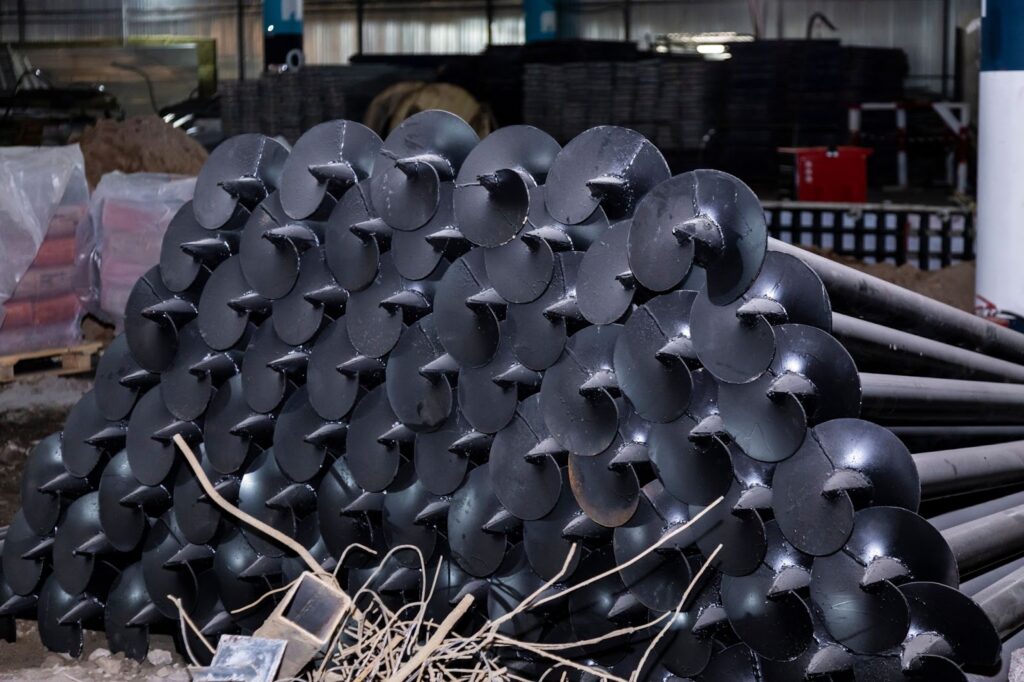
Although diamond piers win when it comes to simplicity & ease of install, helical piers are able to carry heavier loads; think 20,000 lbs. There are some applications where helical piers can even support large commercial buildings or skyscrapers. On the other hand, diamond piers are more traditionally used for porches, decks, walkways, pergolas, gazebos and the occasional tiny home.
What about soil conditions? Both helical and diamond piers can be used in weak or poor soils to some degree. For example, diamond piers are often used to support decks in wet clay-like soils. Helical piers can also tolerate wet soils, but can support even greater loads (think monster sized decks over 6000 lbs). If soil conditions are truly terrible, a structural engineer may actually call for a steel or timber pile instead of a diamond or helical pier.
Diamond Pier For Shed

Diamond piers can be used for small sheds; it all comes down to the loads. As we discussed in the section above, diamond piers thrive when supporting 2000-6000 pounds. If you are building a very large shed, diamond piers will probably not be the answer for your project. Talk to your structural engineer about the best foundation solutions for your shed.
Diamond Pier Foundation Problems

Diamond piers really do hold up over time when installed properly. There are a few potential issues that can occur when installation is not done correctly or if faulty material is provided. We will mention a few of these here.
Cracked concrete head- It goes without being said that a contractor should always inspect their materials prior to installation. If the diamond pier concrete head was delivered with a structural crack, do not install. The integrity is compromised and the product should be returned. Failing to do so will create serious issues for the structure being supported.
Concrete head not leveling- If the concrete head will not stay level during installation, it’s time to check for obstructions. If one or more of the pins are hitting an obstruction in the soil, the result could be issues with the diamond pier head. Something else to consider is whether the hole for setting the concrete head is too large. The hole should be the size of the diamond pier head itself and no larger.
Concrete head set out of level- If the concrete head is set more than 5 degrees out of level, the footing’s structural integrity is compromised. This issue must be fixed in order to prevent long term issues.
Hitting obstructions- When installing diamond piers, an engineer will dictate how many are needed and how far apart they must be spaced. Detouring from this plan will compromise the structural integrity of your project. So, what should be done if your pins are hitting an obstruction? Definitely refer back to the manufacturer’s installation instructions. Keep in mind, If the obstruction is dug out, the soils must be re-compacted.
Pins rising out of the concrete head slightly- If very heavy loads are applied to the diamond pier footing, the pins could slightly move out of the concrete head. First, mention this to your structural engineer. Keep in mind that the foundation system is designed to relieve pressure in this way. The pins can be gently tapped back into their original position.
Environmental Advantages Of Diamond Piers
One of the standout features of Diamond Piers is their minimal impact on the environment. Traditional foundations often require heavy digging, which disturbs the soil and natural ecosystem. Diamond Piers bypass this step, requiring only small pin-driven installations. This preserves the integrity of the landscape and avoids the mess of excavation.
Additionally, Diamond Piers reduce reliance on concrete, which has a high environmental cost due to its carbon footprint. For projects prioritizing sustainability, Diamond Piers provide a clean and responsible foundation solution.
Diamond Piers For House

Traditionally, diamond piers are used for lighter loads such as decks, porches, pergolas, gazebos, and walkways. At Complete Building Solutions, we will not dictate this style of foundation for a residential build. There are simply better, stronger options. However, we have heard of other engineers utilizing these footings for tiny homes. Depending upon the loads and the soil conditions, this could be an option for some tiny homes. A structural engineer can help determine if this is a possibility for your project. Here is an interesting read on a tiny home that was approved to be built on diamond piers.
Weather Considerations During Installation
Diamond Piers can be installed in a variety of conditions, but some weather factors may affect the process. Frozen or overly saturated soil, for instance, can make it more difficult to drive pins into place. However, unlike concrete foundations, which depend on dry, stable weather for curing, Diamond Piers are far less restrictive.
If you’re working in colder climates, pre-drilling small pilot holes in frozen ground can ensure smooth installation. Even in less than ideal conditions, Diamond Piers often remain the faster and simpler solution.
Diamond Pier Alternatives

Diamond piers have become an extremely popular option for light structures such as porches, decks, gazebos, pergolas and walkways. The ease of install and overall simplicity is too good to turn down. However, if diamond piers are not an option for your project, there are alternatives.
Traditional poured concrete footing-
This is probably the most common footing used for decks today. Basically, a hole is dug and concrete is poured into the hole. These footings are extremely strong and typically do well in cold climates. However, they do require excavation and time for curing.
Helical piers-
Helical piers look like a screw and are drilled into the ground. They do well in many soil conditions and can carry heavy loads.
Precast foundation piers are basically a piece of concrete that is ready to be buried in the ground to support your deck. They are very heavy and require equipment to install. The benefit to this type of footing is avoiding curing time.
Deck blocks-
Deck blocks work for decks being built on a concrete slab. The blocks are made out of concrete and come in various sizes and shapes. Square deck blocks are easy to install, do not require digging and are an affordable option. This would NOT be a good option for unstable soils.
We hope this blog cleared up any questions you may have regarding diamond pier footings. Please feel free to reach out with questions at 763-544-3355 or comment below.

